
Small, lightweight, and affordable FPV drone camera is mounted on your aircraft to broadcast live video back to you using a video transmitter. First Person Viewing is referred to as FPV. In order to control his drone, the pilot needs a live analog video feed from an FPV drone camera. The FPV drone camera’s video feed will aid the pilot in flight. FPV cameras come in a variety of sizes and designs.I’ll go through everything you need to consider when choosing and utilizing an FPV camera to make your job easier.

What does the FPV drone camera stand for?
A first-person view camera, or FPV drone camera, is a tool for video flying. A quadcopter or drone is controlled from the perspective of a pilot or driver using an FPV drone camera. Another name for it is a remote-person view (RPV).
How do FPV drone camera work?
The FPV drone camera must be attached to a quadcopter or drone in order to send real-time footage to another device. A remote control screen, monitor, smartphone, tablet, or FPV goggles are examples of additional devices. Lightweight, compact, and fairly priced describe a decent FPV camera.
Analog and Digital FPV Systems
There are two types of FPV systems: analog and digital.Digital FPV systems cannot be used with analog FPV cameras, and vice versa. There are currently three digital FPV platforms: HDZero, Walksnail, and DJI. Cameras made for one type of digital FPV system are incompatible with cameras made for another type of digital FPV system.
Factors to Consider When choosing the best fpv drone camera
Size
Standard, Mini, Micro, and Nano sizes are the four main types of cameras. The mounting holes used to attach the camera to the frame are used to classify these cameras. Every drone frame is unique and supports a certain range of camera sizes. Therefore, it is crucial to consider the camera size before making a purchase, as opposed to purchasing an unsuitable camera that is either too big or too little to fit on the frame you intend to use.
Standard
The FPV drone camera with 28mm mounting holes are regarded as standard designs. They work with several of the medium-sized frames in addition to the bigger ones. This norm was created in 2017 by the RunCam Swift and is now applied to FPV in RC aircraft.
Mini
21mm mounting holes on little cameras often fit medium-sized frames. Since they can now be transformed into FPV/HD cameras, mini-sized cameras have gained popularity recently.
Micro
When using ultra-light racing drone frames, micro-sized cameras are used since every gram counts. But don’t let the diminutive size deceive you—it can perform just as well as a camera of the same size. The mounting holes are separated by 19mm.
Nano
There are no specific mounting choices for nano cameras. They frequently do not include sturdy casings like the standard-sized cameras do. They are typically used on quads that are 2″ or smaller.
Sensor Type–CCD or CMOS
The two types of image sensors used in fpv cameras for drones are CCD (charge-coupled device) and CMOS (complementary metal oxide semiconductor) sensors. The two types differ primarily in how the image is captured by the sensor installed in the FPV camera. For transmission by analog video transmitters, FPV cameras transform light impulses into electrical signals.
CCD and CMOS image sensors both begin by taking the picture and turning it into digital signals. The value (electrons or charge) accumulated by the camera is read in the following step. The similarities between the two stop here. The primary distinction is in the way the electrical signal is outputted and processed.
Electrical signals are moved across a CCD image sensor’s chip and read at one of the array’s corners. Up until all of the pixel lines have finished outputting, the electrical charge from one line of pixels is passed to the next.
A pixel, which is a tiny dot or square that is a portion of a digital image, is read by CMOS sensors individually, unlike CCD. As opposed to a few transistors in a CCD sensor, CMOS sensors have unique transistors for each individual pixel.
The method used by CMOS sensors to capture images is another significant drawback. CMOS sensors utilize rolling shutter, which takes the image line by line, while CCD sensors use global shutter, which catches the image instantly. Any vibrations could result in visual distortion because CMOS sensors output images line by line. The JELLO effect is a name for this distortion.
High-quality images are produced using CCD image sensors, which also have a lower sensitivity to electrical noise. When compared to a CCD image sensor, CMOS often consumes substantially less power and has a lower light sensitivity. Although CMOS sensors still have a poorer image quality than CCD sensors, they are working to catch up with them through ongoing advances.
Aspect Ratio
The shape of the image that the drone’s FPV camera records is referred to as the aspect ratio. The choices are 16:9 and 4:3. A 4:3 image is more square in shape and resembles an old CRT television, whereas a 16:9 image has the appearance of a typical LCD TV or computer monitor. There is no newer or superior aspect ratio than the other. The aspect ratio has very little impact on the image that is taken, but you must make sure that it is the same as the aspect ratio of the screens in your goggles or HMD (head mounted display) to prevent image distortion.
Contrary to popular belief, 16:9 cameras have a larger peripheral (side to side) view than 4:3 ones. This is a false assumption because both cameras will deliver the same width image, but the 4:3 camera will deliver more image vertically due to the maximum pixel ratio that can be sent by the camera and VTX back to the goggles. This can be changed by altering the cameras’ lens field of vision, but that is covered in more detail below.
Consider your existing equipment when deciding what aspect ratio FPV drone camera to buy, and pick a camera that will be the best compatible with it. There are no obvious advantages or disadvantages to either preferred aspect ratio, which is a matter of personal preference.
Latency
To capture and process an image, FPV drone camera need time. Latency is the length of time the camera needs to translate a picture into electrical impulses. the better, the lower the latency.The camera may not be the only source of latency. The LCD panels on the FPV goggles and video transmitters could further increase latency.
For individuals who enjoy drone racing or high-speed flying, latency can be a key consideration when choosing an FPV camera. Lower latency enables faster responses from pilots, improving control and preventing potential collisions or impediments.
Lens Field of View (FOV)
The viewable region that the camera may capture is referred to as the field of view (FOV). The FOV is determined by the camera’s lens size. The FOV is greater with a smaller camera lens.
You can see more with a larger FOV, but that may not always be a good thing. It becomes more challenging to see little features, like tree branches, at a higher FOV. It gets significantly worse with our constrained vTx’s. With a good quantity of view and superb details, an optimal FOV is between 130 and 150 degrees. A camera with both a narrow and broad FOV is shown in the diagram below.
Wide Dynamic Ranging (WDR)
The ability of the camera to catch both the bright and dark areas of a picture is known as wide dynamic range. The distinction between an image’s darkest and brightest areas is known as its dynamic range.
When you fly outside and the light casts shadows, WDR is a concern; on cloudy days, it is less of a concern. The brighter portions of an overexposed photograph are blown out, and the darker portions of an underexposed image appear even darker.
Overexposure and underexposure are typically perfectly balanced on a competent WDR-capable camera. WDR is usually turned on by default in today’s FPV drone camera.
Video Encoding Format- NTSC or PAL
NTSC and PAL are the other two output types for FPV drone cameras. However, choosing which is still another non-decision. Both standards can be supported by the majority of video transmitters and many FPV cameras.
But you should be aware that these two video encoding standards differ from one another. First, different regions of the world adopt these two standards. North America, Japan, and South Korea all utilize NTSC. The majority of Europe, Australia, Africa, and Asia utilize PAL. Because other individuals you work with, such as other pilots, parts suppliers, competition organizers, clients, and so on, are probably more accustomed to the regional norm, you may decide to stick with it. However, since the majority of FPV equipment can convert between these two standards, it really makes little difference when choosing parts.
The more important difference between NTSC and PAL is that PAL offers greater resolution, while NTSC has a higher frame rate:
- PAL: 720 x 576 @ 25fps
- NTSC: 720 x 480 @ 30fps
So, if image quality is more important to you, choose PAL. NTSC is preferable if you desire a more fluid image.However, the majority of FPV drone cameras, transmitters, and displays support both encoding formats, as was previously highlighted a few times. Therefore, the other criteria mentioned in this post will have a considerably higher impact on your choice while you are looking for FPV equipment than the video encoding standard.
TVL- Camera Resolution
Manufacturers define TVL, or “TV lines,” as the unit of measurement for analog FPV drone camera resolution.
By attaching the camera to a display and having it take a picture of a card with alternating black and white lines, TVL may be calculated. The TVL value of a camera, which reflects the level of visual detail it can produce, is the most clear black and white lines that it can identify.
However, as manufacturers frequently overstate these numbers as a marketing tactic, TVL has lost some of its significance in recent years. Choose your camera based on the image quality displayed in reviews rather than depending solely on TVL.
FPV Drone Camera Reconmmendations
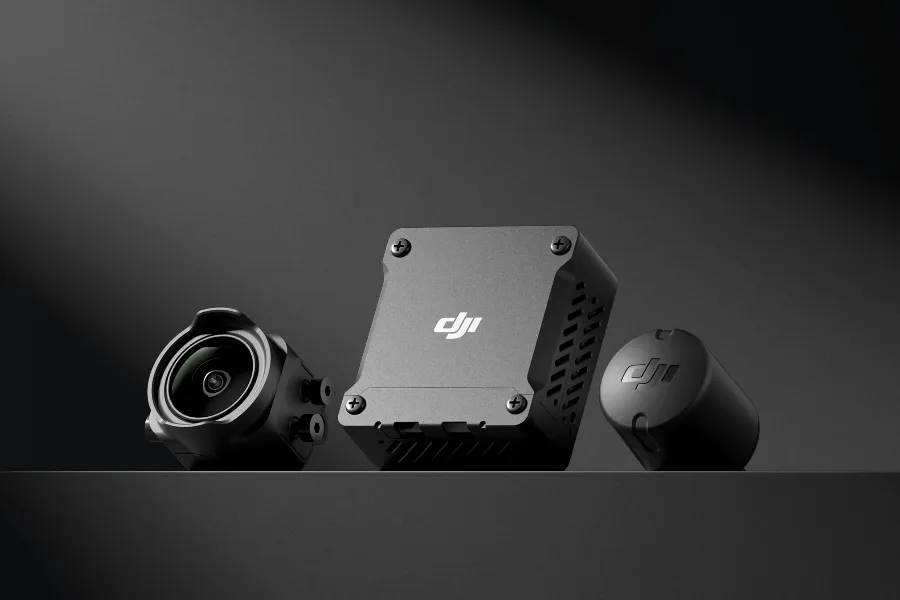
DJI O3 Air Unit
- DJI O3+ Flagship Transmission
- Next-Level Imaging Performance
- Canvas Mode
- Compact and Richly Compatible
There is only one camera choice available for the DJI O3 Air Unit. It may not be the best in terms of low light performance, size, weight, or latency, but among other FPV cameras, it excels in terms of image quality. The image quality of the O3 Air Unit is significantly better than that of the previous DJI FPV Air Unit, with additional options for resolution and frame rate as well as higher dynamic range and detail. The inclusion of capabilities like a built-in radio control link, 4K stabilized onboard recording, and a real 1080p video link justifies the DJI O3 System’s premium pricing. These capabilities might be enough for some users to do away with a bulky HD action camera, making the quadcopter lighter and performing better during flight.
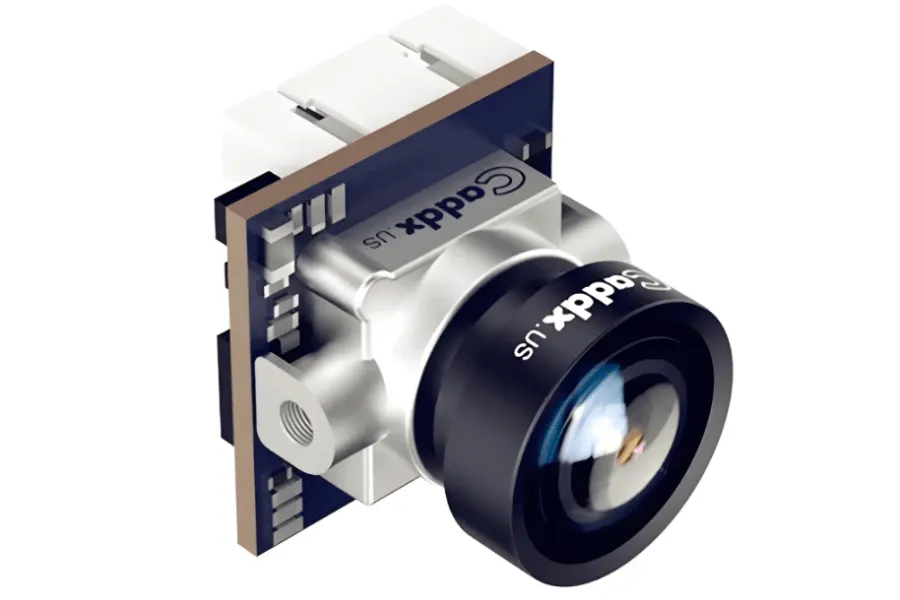
Caddx Ant Nano FPV Camera
- Tiny and lightweight: It weighs only 2 grams, is one of the smallest and lightest FPV cameras on the market.
- Good image quality: It has a 1200TVL resolution and a 1/3″ CMOS sensor, which allows it to capture clear and detailed video footage.
- Wide field of view: It has a wide field of view of 160 degrees.
- Easy to install
Overall, the Caddx Ant Nano FPV camera is a powerful and versatile micro FPV camera. It is one of the most popular micro FPV cameras in the European and American markets.
Foxeer Razer Mini Camera for Drone-Cheapest Analog Camera
- Wide dynamic range
- Great features
- Top-quality image sensor
- Low latency
The best FPV camera for racing drones is the Foxeer Razer Mini. With 1200 TVL and a premium 2.1mm lens, it offers excellent clarity and light handling in both bright and low light conditions.
The camera also has a low latency of 4ms, cutting-edge Natural Image technology, an HD 2.1 mm lens, a 1/3″ CMOS sensor, and multi-voltage capabilities. The Foxeer Razer Mini might be the ideal FPV camera for folks on a tight budget, given its reasonable price.
The camera is compatible with any set of goggles thanks to the voltage range of 4,5V to 25V. You are allowed to select the aspect ratio setting that you prefer between 4:3 and 16:9.
RunCam Swift Mini 2
- One-of-a-kind model
- Easy setup
- Built-in OSD
- Wide viewing angle
- Lacks a microphone
A decent FPV camera with an OSD is the RunCam Swift Mini 2. The Swift Mini 2 and its predecessor are fairly similar, but the new camera features an OSD and five pre-set image settings for taking excellent photos both in the light and the dark.
To ensure that the most stunning landscapes are captured, the camera is equipped with a top-notch 1/3″” SONY Super HAD II CCD sensor and 2.1mm (M12) of FOV165°.
JohnnyFPV’s customized settings are available on the RunCam Swift Mini 2. The camera is intended to accommodate any frame that needs a small FPV camera, such as the 3″ mini quad (150) market.
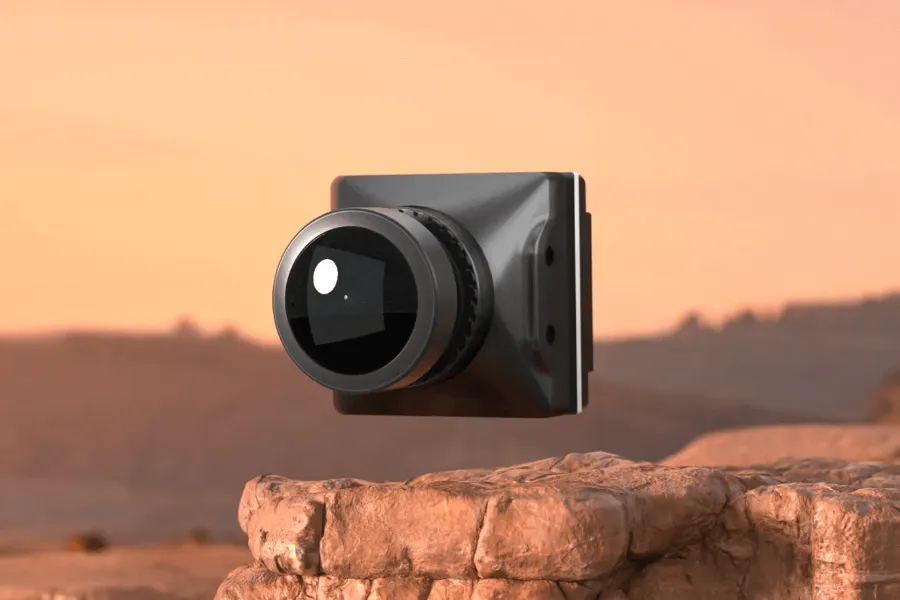
RunCam Split 4K
- Smallest 4K FPV&HD 4K Camera
- Easy Installation
- UART Control
Another fantastic choice is the RunCam Split 4 4K FPV Camera, which is the smallest 4K FPV drone available and is intended to be placed in tiny “toothpick” microdrones like the BetaFPV Nano. This camera offers some of the lowest latency available for FPV cameras with excellent WDR and low light image handling. Simply by attaching the camera to the flight controller, you may select between the 16:9 and 4:3 formats and control the camera using the controls on the radio.
It is ideal that the DVR feature is independent from your FPV stream. Additionally, the quad automatically begins recording when you turn it on.
Caddx Ratel 2-Best Value Analog Camera
- Show real colors and capture better images
- Integrated scene all-weather camera, can easily cope with whether it is daytime or night shooting
- 165°bigger fov, is the best analog freestyle camera
- The lens is imported from Japan, and the thickened frame enhances the anti-collision performance.
Since it has been available on the market for some time, the Caddx Ratel 2 has received a sizable amount of favorable evaluations. Given the performance it gives, the camera is reasonably priced. The Ratel 2 offers accurate color reproduction with no digital artifacts and a wide dynamic range that is well-balanced with contrast.
Walksnail Avatar Pro-Best Lowlight Camera
The Avatar Pro camera has a native 4:3 image sensor and a 1/1.8-inch Sony Starvis sensor. Although the Pro version performs exceptionally well in low light, the regular camera has marginally higher daytime image quality.
In low light, the Avatar Pro camera performs better than any other camera in the Avatar portfolio. Compared to the V2 camera, the Pro camera has a little higher latency (less than 5 ms).
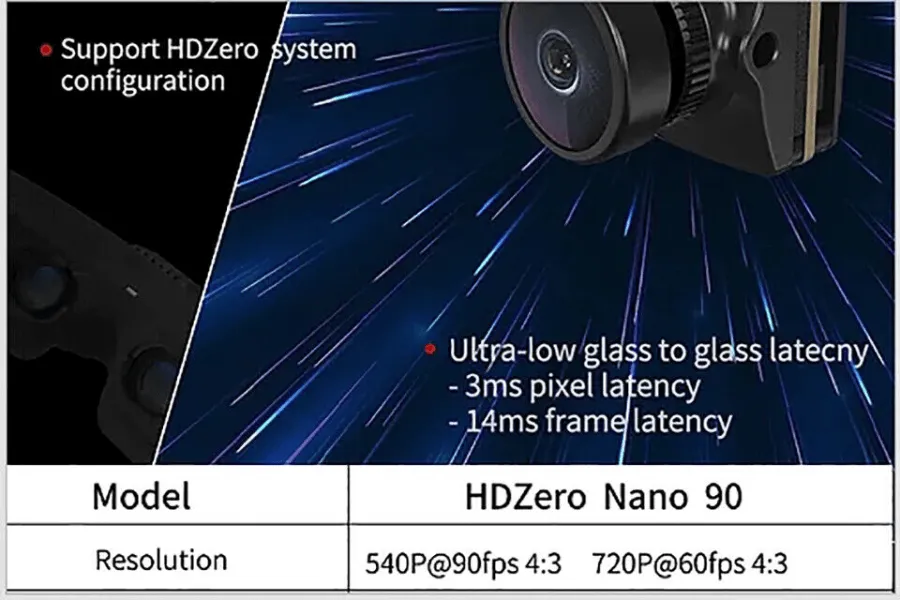
Runcam HDZero Nano90 Camera–Best HDZero Camera
With the lowest latency of any existing video link, the Runcam HDZero Nano90 Camera delivers race-winning performance for the HDZero system in 540p 90fps mode. In addition, it has remarkable low light performance and supports resolutions up to 720p 60 frames per second. Be aware that the HDZero VRX can only use 720p 60 frames per second; only the HDZero Goggles support the 540p 90 frames per second option. However, the quality of the images is comparable to that of the Runcam Micro V2.
FAQ
Can I Use HD Cameras as FPV Cameras?
It’s true that GoPro and other HD action cameras are used to produce many of the beautiful HD FPV films you’ll find on YouTube. However, these cameras aren’t usually the best choice for real-time FPV flight.
For FPV, you can use some HD cameras that can link to a video transmitter via “video out” connections. Unfortunately, these cameras’ latency (sometimes more than 100 ms) makes them unsuitable for FPV flying, which can make it difficult to respond quickly enough to avoid crashes. So, it’s best to use an FPV camera specifically designed for real-time flying.
How to Connect an Analog FPV Camera to a VTX?
Depending on the component and application, there are different ways to wire an analog FPV camera in your drone. Three wires need to be connected in order for an FPV camera to function: the video signal, power, and ground.
In order to obtain an image, you must first connect the signal wires from the FPV camera to the VTX and make sure your FPV goggles have a functional video receiver on the same channel. Additionally, if the FPV camera and VTX are powered by separate sources, connect their ground wires.
Using a camera that supports 5 volts is advised because most cameras run on this voltage. Attach the camera to the flight controller by means of the video (yellow), ground, and 5-volt wires. Locate the designated “cam” or “VI” (video in) pads on the flight controller and attach the wires appropriately. Solder the wires onto the pads to make sure the connection is secure.
Due to the fact that the VTX needs a power source other than 5 volts, connecting it can be a little trickier. The voltage range in which most VTXs function is 7 to 24 volts. You can power the VTX using the built-in voltage regulator (such as one that runs at 12 or 9 volts) on your flight controller. If not, you will have to use the battery to power the VTX separately.
Find the appropriate pads on the flight controller marked “VO” or “VTX” (video out) to connect the VTX. Attach the VTX’s ground (black) and video (yellow) cables to the appropriate flight controller pads. A power source is needed to run the red wire from the VTX. You can attach the red wire to the 5-volt pad if your flight controller includes a 5-volt regulator. If not, the VTX will have to be powered by the battery.
Connecting the FPV Camera and VTX Without OSD
There is a little difference in the connection procedure if your flight controller is not equipped with an OSD. Attach the camera using the ground, 5-volt, and video wires in the manner previously mentioned. Connect the ground (black) wire of the VTX to any ground pad on the flight controller that is available. The camera’s video (yellow) wire and the VTX’s video (yellow) wire need to be linked. For a secure connection, solder the two yellow wires together and wrap them in heat shrink tubing. To supply power to the VTX, attach the black wire to a flight controller’s ground pad and the red wire to the flight controller’s positive pad, battery voltage (VCC), or power distribution board (PDB).
Why is My FPV Camera Blurry?
Because it is out of focus. If the lens is not in focus, the video footage will be blurry. Check the focus of the lens and adjust it if necessary. To adjust the camera focus, you just need to screw the lens in or out until you find the sweet spot. The first thing you want to do is to unscrew and loosen the lens from the camera. By turning the lens clockwise, both the lens and lock nut should come loose at the same time. If not, try loosening just the lock nut first by turning it clockwise. For standard size cameras, you can just use your fingers to turn the locknut. With the smaller lenses on the Micro cameras, you might find it easier with a pair of tweezers.
If you focus your camera with objects too close, the camera might look blurry with object further out. And vice versa. If you are focusing on the test pattern, put it about 3 meters away (10 feet). If you are using the surrounding as reference, you want to stand further away, around 10 meters (30 feet). As long as you can see clearly at this distance, you should be fine when flying FPV.
How to Choose the Night Vision FPV Cameras?
Cameras with low light capabilities are excellent at making the most of the light that is available. The measurement known as “LUX” is used to quantify their performance in low light environments. The camera performs better at night the lower its LUX value. FPV cameras with black and white modes as low as 0.00001 LUX are now readily available, making them perfect for night flying.
However, your camera can still have trouble capturing a decent image if there isn’t a full moon, a clear sky, or adjacent street lights to provide lighting. Here’s when a homemade infrared torch would be useful.
How to Record Flight Footage from Your FPV Camera?
There are several ways to record flight footage from your FPV camera:
- FPV Goggles with DVR: The majority of FPV goggles come equipped with a digital video recorder (DVR) that captures everything seen on the screen, including signal interruptions.
- VTX with Onboard Recording: Video transmitters (VTX) that have onboard recording capabilities can produce video of a higher caliber than that of DVR recordings in goggles. They exclude signal disruptions that occur while in flight. The Walksnail Avatar VTX and the DJI O3 Air Unit are two examples of these VTXs.
- External DVR for Analog: An external DVR that is directly attached to the FPV camera within the drone can be used for analog installations. This technique captures video without interference and typically produces images with higher quality since the 5.8GHz wireless link does not degrade the quality of the image.
- GoPro or Other Action Cameras: If you want the highest quality images, you might think about placing an action camera on your drone, like a GoPro. This option records high-quality video that can be shared online or utilized for performance analysis during flight.