Flight Controller Explained: The Ultimate Guide to Understanding FPV Drone Flight Control System
For beginners, the number of flight controllers (or FCs for short) for FPV drones can be overwhelming. This guide explains all the features and differences, and highlights important factors to consider when choosing a mini quad FC.
What is a flight controller quadcopter
The flight controller (aka FC) is the brain of the aircraft. It is a circuit board with a variety of sensors that detect the motion of the drone as well as user commands, and then uses that data to control the speed of the motors (motors) in order to make the craft move as instructed.
Almost all flight controllers have basic sensors such as Gyroscopes (Gyro for short) and Accelerometers (Acc for short). Some FCs include more advanced sensors such as barometers (air pressure sensors) and magnetometers (compasses).
FCs are also hubs for other peripherals such as GPS, LEDs, sonar sensors, and more.
FPV drone flight controllers are evolving rapidly: becoming smaller, integrating more functions, and using better processors and hardware.
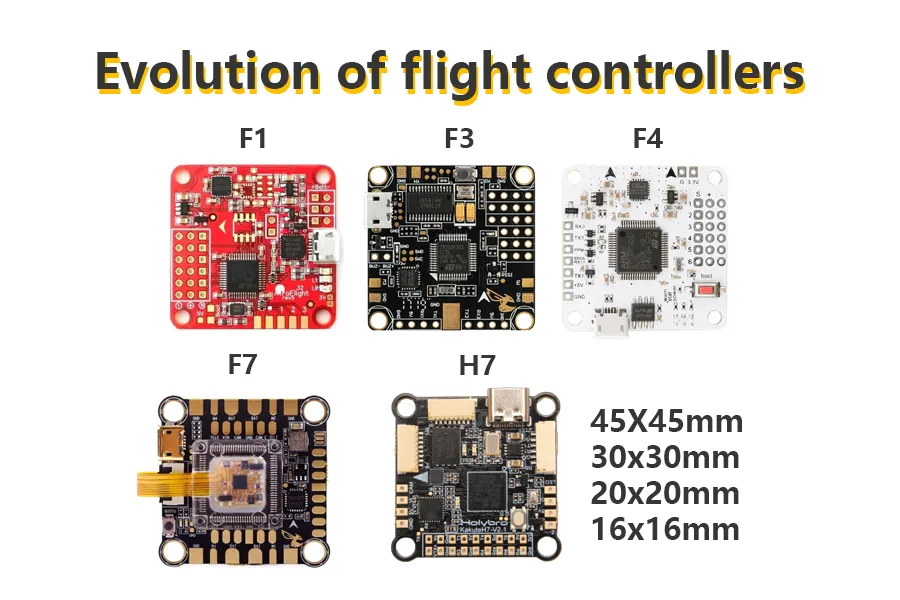
Evolution of Controllers – Flight Controller Dimensions (Mounting Hole Pitch), MCU and Functionality
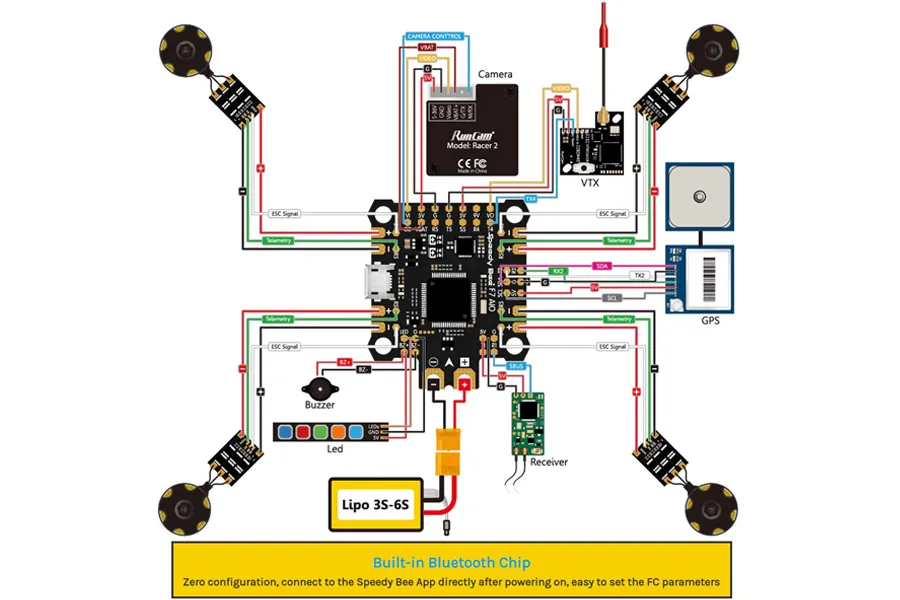
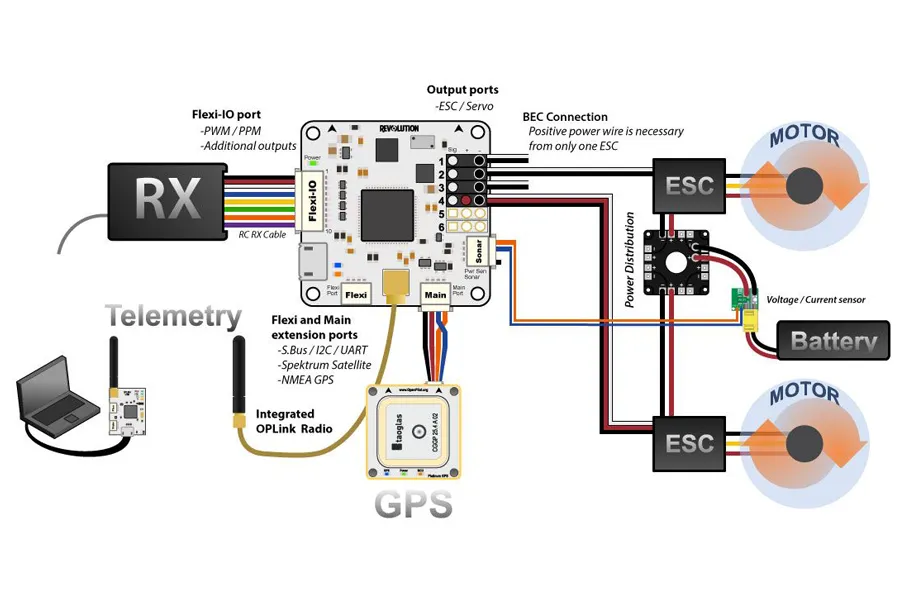
FC connection
This is a sample wiring diagram to connect components in a drone to a quadcopter best flight controller.
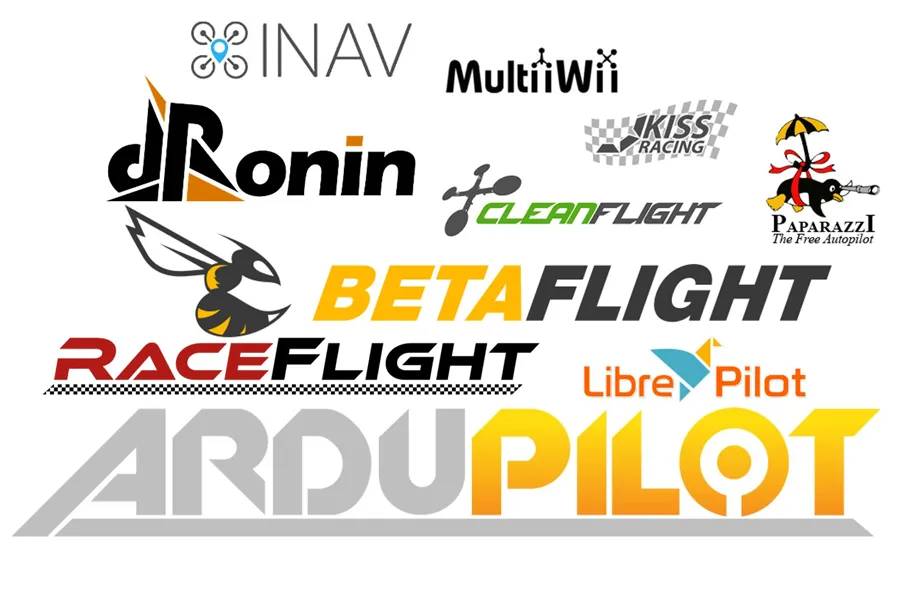
Flight Controller Firmware
In addition to hardware options, you can also choose to run different firmware on FC, which provide different functions and features for various applications. For example, iNav was designed with GPS use in mind, while KISS is more focused on racing and ease of use.
If you don’t know which one to choose, my suggestion is Betaflight
Flight controller firmware (flight control firmware)
Betaflight is open source, developed and maintained by the community (https://github.com/betaflight/betaflight/releases). It has the largest user base, so you’ll be more likely to get help if you run into problems. It also has the widest range of flight controls. (There is also the recently emerged Emuflight, which is a modified version of Butterflight, but its popularity is far less than Betaflight)
Other popular firmware for FPV drones are FlightOne and KISS. They are all closed source, and the hardware and firmware are controlled by private companies, so you can only use their own flight controllers.
After selecting the FC firmware, you can look for a compatible drone flight control board.
Interfaces and configuration
Modern flight controller firmware can be configured from a computer, smartphone or even from a radio controller (remote control). Each firmware offers a different user interface (UI) and various parameters that can be changed. Some of the UIs look similar, but plugging the same settings into different firmwares can provide very different features, so it can be like a learning curve when using a new firmware.
” Tuning tuning” is a term we use in the multi-rotor hobby when changing parameters such as PID, RC rate or other settings to achieve desired flight characteristics.
processor
Processors in FC are also known as Microcontroller Units (MCUs), they are used to store the firmware code and handle all the complex calculations.
Currently, there are 5 main types of MCUs used in FC: F1, F3, F4, F7 and H7. The main differences are computational speed and memory size:
| F1 | F2 | F3 | F4 | H7 | |
| Speed | 72MHz | 72MHz | 168MHz | 216 MHz | 480 MHz |
| Memory | 128KB | 256KB | 1MB | 1MB | 2MB |
After checking the information of the H7 chip, it should be 2M. Liang wrote 128KB. I hope you can correct me. PS: flightone has released the H7 flight control in February, but it has not yet been launched.)
This article will explain the differences between F1, F3, F4 and F7 MCUs in more detail.
We recommend you use an F4 or F7 flight controller as the latest version of Betaflight no longer supports F1 and F3 due to lack of storage space for extended firmware.
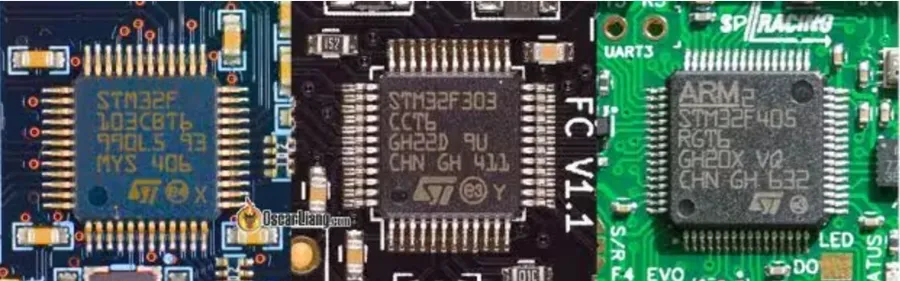
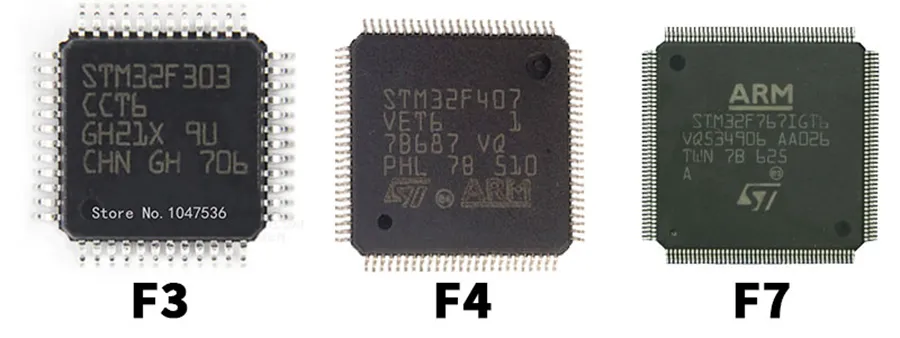
Flight control processor: from left to right: STM32 F1, F3, F4 (from ST)
Flight Controller MCUs – F1, F3, F4, F7 and H7
What is a best flight controller for quadcopter MCU?
All flight controllers running Betaflight, Emufligh, Cleanflight or other flight software are based on STM32 type microcontrollers or MCUs (also known as “processors”). The STM32 is a family of 32-bit microcontroller integrated circuits from STMicroElectronics.The STM32 family consists of a series of microcontrollers: H7, F7, F4, G4, F3, F2, F1, F0,…. Internally, each microcontroller consists of a processor core, static RAM, flash memory, debug interfaces and various peripherals. It is the main processing unit of the flight controller. It runs dedicated programs called firmware (e.g. Betaflight) and controls the quadcopter by sensing and measuring the environment with the help of external sensing devices (gyroscope, accelerometer, compass, barometer and GPS).
The main differences between the STM32 microcontroller families are: internal architecture, clock speed, internal flash size, number of peripheral interfaces, etc.
| Comparison table by max clock frequency | |||||
| H7 | CortexM7 | 400 | 2048 | 1024 | High performance |
| F7 | CortexM7 | 216 | 2048 | 512 | High performance |
| F4 | CortexM4 | 180 | 2048 | 384 | High performance |
| F1 | CortexM3 | 72 | 1024 | 96 | Mainstream |
| F3 | CortexM4 | 72 | 512 | 80 | Mainstream |
wikipedia:https://en.wikipedia.org/wiki/STM32
F1
F1 series MCUs were released in 2007. These are the MCUs that started the era of flight controllers.NAZE32 was the first flight controller based on STMF103 and Baseflight firmware. The most commonly used MCU was the STM32F103CBT6 with 128Kb of firmware flash space. This MCU is currently obsolete as Betaflight support for the F1 MCU was discontinued in 2017. The last version that supported F1 was Betaflight 3.2.
F3 flight controller
The f3 micro flight controller series MCUs were released in 2012. They feature a core speed of up to 72 MHz and a general-purpose flash size of up to 256 Kb. The F3 is almost pin-compatible with the STM32 F1 series. The higher clock speed allows running cycle times up to 2x higher than the previous generation of F1 microcontrollers, up to 8 KHz.The F3 microcontrollers have 3 serial ports for peripherals.
This MCU is currently obsolete, as Betaflight support for the F3 MCU was discontinued in 2017. The last supported version of the F3 was Betaflight 4.0.
F4
F4 series MCUs were released in 2011. So the F4 MCUs were actually released before the F3. They have a slightly faster clock speed and can run up to 32KHz cycle time. The most popular F4 MCUs are the STM32F405RGT6 with 168Mhz and the STM32F411CCU6 with a 100MHz clock speed, but with a smaller footprint for smaller boards.
F7
F7 family of MCUs was released in 2014 with core speeds up to 216MHz and general purpose flash sizes up to 2048Kb. The F7 is pin compatible with the STM32 F4 family. The most popular MCU is the STM32F722RET6 with 512Kb Flash, 128Kb RAM and 5 hardware UARTs.
H7
H7 is the latest MCU, released in 2017. It was designed as a faster and more cost-effective replacement for the F7 series. The clock speed is almost doubled to 400 MHz. thanks to an improved semiconductor manufacturing process from 90 nm down to 40 nm. this also reduces power consumption. the H7 series is cheaper than the F7 series because of the reduced size of the internal flash memory (which is replaced by using cheaper external memory).
Inverted/Non-Inverted Serial Ports
The F3, F7 and H7 series microcontrollers have a built-in feature to invert the serial signals. The other MCUs – F1 and F4 do not have built-in inverters, so you will need to invert the SBUS and S.Port signals via an external inverter, or the flight control manufacturer will have to implement an additional inversion component on the FC board.
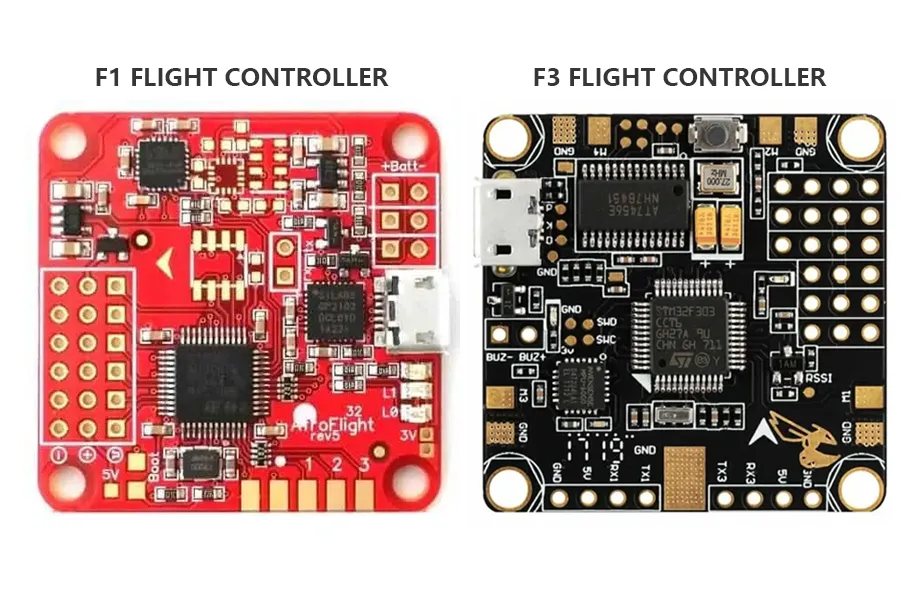
Differences between F1 and F3 flight controls
the F3 has the following advantages over the F1:
Similar clock speeds on paper, but the F3 has faster floating point calculations due to the dedicated floating point unit (FPU)
There is 1 extra UART on the F3 (3 vs 2) and the F3 has a dedicated USB port so when it is connected to the computer via USB, UART 1 is not occupied as it is in the F1 FC, so in this sense UART1 is more powerful in the F3 (3 vs 1) as we usually try to avoid using UART1 on the F1 board.
All UARTs on the F3 have native inversion built in, which means you can run SBUS and smart ports directly without any modifications!
The newer F3 FCs have better design and features than the older F1 FCs
Processing power (speed)
F1 and F3 have the same clock speed of 72MHz, while F4 has 180Mhz.
Although F1 and F3 have the same maximum speed, F3 can process floating-point calculations faster due to the FPU (math coprocessor). In the floating point PID controller, the F3 runs significantly faster than the F1.
As many of you may already know, the 2K cycle time is pretty much the highest cycle time we can run on Betaflight’s Naze32 board. It simply can’t go much higher because the processor can’t keep up. (It can be pushed to 2.6KHz but it’s not stable)
The F3 board can easily go up to 4K cycle times and can even run other CPU intensive tasks such as accelerometers, LED strips, soft serials etc. We can even run 8KHz with Acc disabled, but with the F1 board we need to disable many of these features before we can run only 2K.
In general, depending on the PID controller, the number of serial ports used, the number of Aux channels, etc., we can achieve the following cycle times (assuming ACC is disabled)
When people talk about 8K/8K or 4K/4K, they are referring to the cycle time and gyro sampling rate.
- F1 mainly runs between 2K-2.6K, if you have CC3D they can run 4K/4K because of the SPI gyroscope
- F3 and F4 with SPI gyro bus can run 8K/8K, but with i2C gyro they can only run 4K/4K.
- only FC currently available that can do 32K/32K is the Raceflight Revolt with the ICM-20602 gyro.
All of these FCs can run ESCs up to 32K ESC update rate without additional loss. After setting a new cycle time, always check the CPU utilization via the CLI command “status”, the general consensus suggests that it is best to keep the CPU utilization in the BF below 30%, some people may avoid more.
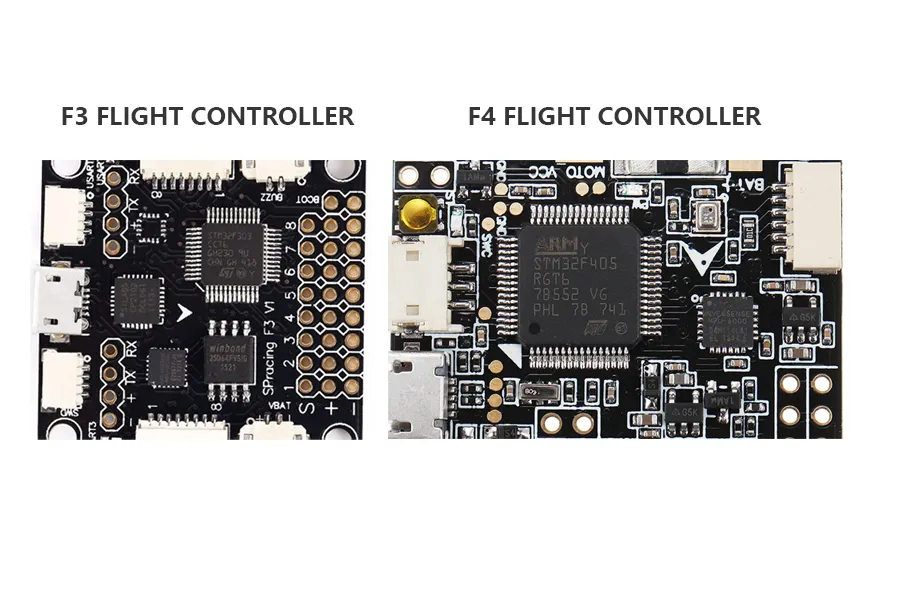
F3 vs F4 Flight Controller
F4 has a higher processing speed at 168MHz than F3 at 72MHz. You can run 32KHz Looptime on the F4 but not on the F3; both the F3 and F4 can handle 8K or less very well, but the F4 allows you to run other functions at a lower percentage of CPU load. Especially now with the new “dynamic filter” feature, which is quite a lot of processing, the F4 has a definite advantage in this regard.
F4 FCs usually have at least 3 UARTs, sometimes as many as 5, depending on the actual board design and pinout; F3 FCs usually have only 3!
Most F4 FC are supported by Betaflight and Raceflight firmware (the latest Raceflight One is now closed source and only supports their own FC, Revolt)
F1 and F4 FC do not have a built-in inverter in the processor like F3 or F7. If you want to run SBUS or Smart Port, you may need to do an inversion hack (to get the signals that are not inverted); the F3 and F7 have inverters built into all the UARTs because they are the new generation of MCUs!
Since the processor on the F4 FC is more powerful, it is possible to drive the OSD functions from the main processor instead of using a dedicated OSD chip, e.g. BrainFPV RE1
F7 vs H7 Flight Controller
Quantity of Ports and Connections
F7s offer a wide range of ports and connections, including UART, PWM, and USB. While F4, F7, and F722 FCs offer a substantial number of ports and connections, the H7 FC usually follows suit. Its advanced architecture allows for a wide range of connectivity options, enabling the connection of various devices and sensors to the drone.
Firmware compatibility
The F7 Flight controllers for drones support the latest firmware such as Betaflight and Cleanflight. Ensuring that the firmware is kept up-to-date is essential to access the latest features and bug fixes.
H7 FCs support the latest firmware such as Betaflight and Cleanflight, ensuring flexibility and customization similar to other FC generations. However, some advanced features may be optimized to fully leverage the capabilities of the H7 processor.
Performance in Acrobatic Flights and Advanced Applications
F7 FCs are suitable for pilots seeking extreme performance and aiming to execute advanced acrobatic maneuvers. The F7 might offer a slight advantage in terms of responsiveness and precision, but the difference could be negligible for many pilots.
The H7 Flight controllers for drones is designed to deliver exceptional performance, making it ideal for pilots seeking the utmost in acrobatic flights and advanced applications. Its superior processing power allows for tackling complex maneuvers with extreme precision.
Processing Capacity and Performance
The F7, with its advanced processor, can handle complex real-time data processing, making it ideal for pilots seeking maximum control and extreme performance.
The H7 FC stands out for its exceptionally high processing capability. This allows it to handle complex real-time operations, paving the way for advanced features and enabling the control of sophisticated drones with numerous sensors and navigation options.
F7 vs F4 Flight Controller
Regarding to the F7 vs F4 Flight Controller, the F7 can handle more complicated algorithms and computations than the F4 due to its greater processing speed (216MHz vs. 168MHz), which is particularly helpful as flight control software gets more advanced. The superscalar pipeline and DSP capabilities of the F7 also improve its platform for firmware development in the future, guaranteeing that it will continue to be a viable option for pilots for many years to come.
The quantity of UARTs available is one benefit that F7 flight controllers have over F4 boards; F7 boards usually have more UARTs integrated in. Moreover, signal inversion is integrated into every UART on a F7 board, making it easier for pilots to use FrSky receivers.
Processing Power
The main difference between F4 and F7 flight controllers is their processing power. F7 flight controllers have a faster clock speed, which allows them to process more complex flight algorithms and calculations. This can lead to improved performance in a number of areas, including:
- Flight stability: F7 flight controllers can more accurately control the drone’s attitude and position, which can lead to smoother and more stable flights.
- Response time: F7 flight controllers can respond to changes in the drone’s environment more quickly, which can improve agility and performance.
- Advanced features: F7 flight controllers can support more advanced features, such as object avoidance and autonomous flight.
IMU Performance
F7 flight controllers typically come with more advanced IMUs than F4 flight controllers. IMUs are used to measure the drone’s orientation and motion. A more advanced IMU can provide more accurate data, which can lead to improved flight performance.
Interfaces
F7 flight controllers typically have more interfaces than F4 flight controllers. This allows you to connect more sensors and devices to your drone. For example, F7 flight controllers may have additional UART ports, SPI ports, or I2C ports.
Applications
F4 flight controllers are a good choice for most drone applications, including racing, freestyle, and photography. They offer good performance and value for the price. F7 flight controllers are a better choice for demanding applications such as racing, freestyle, and autonomous flight. They offer improved performance and features, but they are also more expensive.
Advantages of the F7 FC over the F3 and F4
F7 is a faster processor (216MHz vs. 168MHz in F4) such as MEPS SZ F7 HD.
F7 offers more UARTs with built-in hardware inversion
F7 has superscalar pipeline and DSP capabilities – basically this means that the F7 is a better platform for future development, allowing developers to further optimize flight controller algorithms
The faster F7 processor can theoretically achieve faster cycle times without the need to overclock like the F4 running at 32KHz. This is not entirely true, however, as the cycle time is also limited by the type of gyroscope (IMU) and its sampling rate. For example, with the MPU6000, sampling is limited to a maximum of 8KHz, and if you want to reach 32KHz, you must use a faster MPU such as the ICM-20602.

What is UART in flight controller?
UART stands for Universal Asynchronous Receiver/Transmitter.
UART is a hardware serial interface that allows you to connect external devices to the flight controller. For example, serial radio receivers (receivers), telemetry, radio transponders, VTX control, etc.
Each UART has two pins, TX for sending data and RX for receiving. Remember, TX on the peripheral connects to RX on the FC and vice versa.
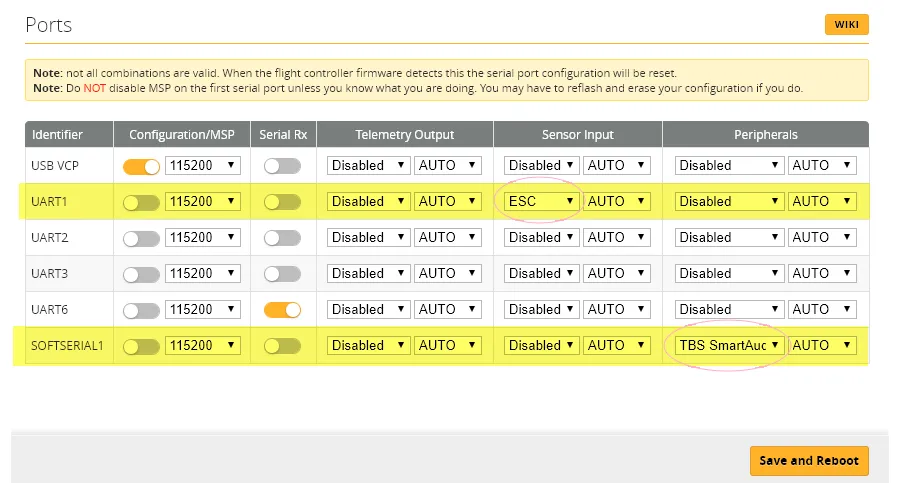
For example, this is UART3 (R3 and T3 pins) and UART6 (R6 and T6 pins) on the flight controller. You can assign tasks to these UARTs in the Ports tab of the Betaflight configurator.
How many UARTs on an FC
You may not need many UARTs, but more is always handy.
The number of UARTs available depends greatly on the design of the board and the processor used. For example, an F1 FC usually only has 2 UARTs, while the F3 and F4 can have between 3 and 5, and the F7 can have between 6 and 7.
UART and inverted signals
F3 and F7 can handle inverted signals locally, while F1 and F4 cannot.
Frsky SBUS and SmartPort signals are inverted at the outputs, and the good news is that the F3 and F7 flight controllers can read these signals just fine. This is because they are newer generation processors with integrated inverters.
However, older processors, such as the F1 and F4, require an external inverter to “convert” the signals before feeding them to the UART. for your convenience, almost all F4 flight controllers have a dedicated pad for SBUS, to which you can solder the RX directly. Otherwise, you can use a workaround such as using soft-serial for the SmartPort, or getting the same phase signal from RX.
If you run out of UART ports, you can use the Betaflight feature SoftSerial to “create” up to two additional UARTs; SoftSerial is a way to emulate UART ports in software, but the emulated UARTs have a lower baud rate (update rate). SoftSerial is a method of using software to emulate a UART port, but the emulated UART has a low baud rate (update rate). This makes it unsuitable for timing critical tasks such as RX connections. Note that SoftSerial also increases the CPU load.
Gyroscope Sensor – IMU
The job of the IMU sensor is to measure the motion and orientation of the quadcopter.The IMU sensor contains both accelerometers and gyroscopes.
Probably the most commonly used flight modes in Betaflight are Acro Mode (aka Manual Mode) and Angle Mode (aka Auto-Level Mode.) Acro Mode uses only the gyroscope, while Angle Mode uses both the accelerometer and the gyroscope.
Since most FPV drone pilots only fly in Acro mode, the accelerometer is usually turned off to free up processing power. This is why we usually refer to the IMU simply as the gyroscope.
Type of IMU
| IMU | Possible communication protocol (BUS) | Maximum Effective gyro sampling frequency |
| MPU6000 | SPI, i2c | 8K |
| MPU6050 | i2c | 4K |
| MPU6500 | SPI,i2c | 32K |
| MPU9150* | i2c | 4K |
| MPU9250* | SPI,i2c | 32K |
| ICM20602 | SPI,i2c | 32K |
| ICM20608 | SPI,i2c | 32K |
| ICM20689 | SPI,i2c | 32K |
* The MPU9150 is actually the MPU6050 with an integrated AK8975 magnetometer, while the MPU9250 is the MPU6500 with the same magnetometer.
You can find the IMU model number printed on the chip, for example, this is the popular Invensense MPU-6000.

Gyroscopes and accelerometers on flight controllers
Gyroscope selection: sampling rate and noise
In flight controllers, there are two main attributes of the IMU to consider: the maximum sampling rate and the sensitivity to noise (electrical and mechanical).
Currently, the most widely used IMU is the MPU6000, as it supports sampling rates up to 8KHz and has proven to be one of the most noise-resistant IMUs. The general consensus is to avoid the MPU6500 and MPU9250 despite their higher sampling rates.
There are also performance differences between the ICM family of gyros. For flight control, the ICM20689 is one of the worst gyros in terms of being susceptible to noise and having a high failure rate. If you must choose an ICM gyro, use the 20602 instead.
To minimize calculation errors due to vibration transfer from the motor to the system, some FC gyros are “soft-mounted” (damped) on foam.
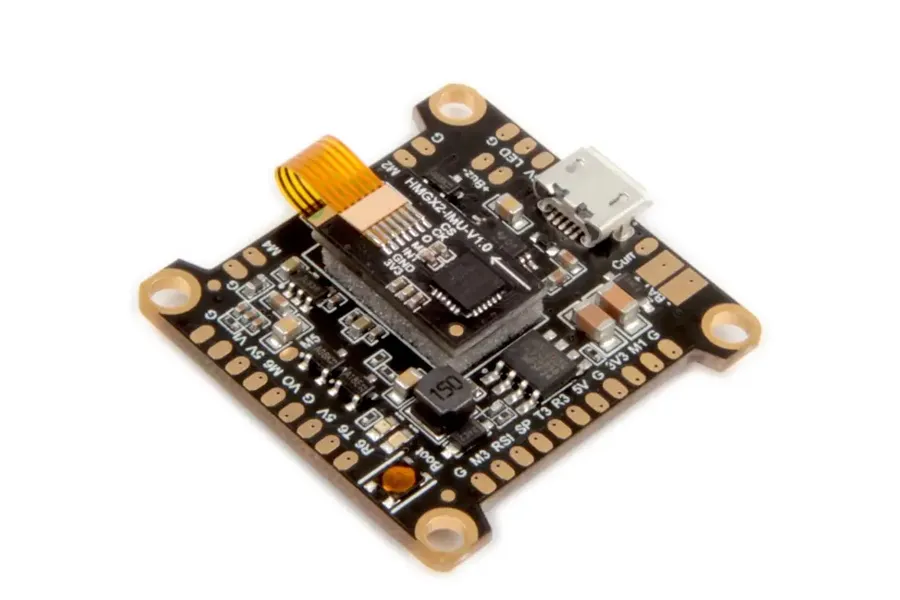
Soft gyro – Kakute F4
UPDATE (October 2019): Since Betaflight 4.1 has removed the 32KHz mode, you will only be able to run up to 8KHz cycle times even if you will be using Betaflight with an ICM gyroscope.
One of the reasons BetaFlight removed 32KHz support may be due to the gyroscope becoming a double-edged sword more quickly. Smoothing out the signal and power process would allow the ICM series to outperform the MPU6000 at 8KHz at 32KHz. However, electrical noise and/or physical vibration from ESCs and motors can be introduced and the performance degradation of the ICM is much more severe than the MPU6000.
Gyro Bus – i2c and SPI
SPI and i2c are types of “BUS”, the communication protocol between the IMU sensors and the processor. the type of BUS has a significant impact on the effective sample rate and the maximum flight controller cycle time.
The preferred BUS is SPI, which allows you to run the Gyro at a much higher refresh rate than I2C at 4KHz. Almost all flight controllers today use SPI.
Layout
FC layout is where the pins/pads are located on the board and how easy it is to connect components.
Many people are only concerned with the functionality of the flight controller, but overlook the importance of layout.
The CLRacing F7 and Kakute F7 are good examples. Both are excellent flight controllers that I personally recommend, but based on layout alone, the CLRacing F7 is clearly superior because all of the strike pads are located on the edges and are grouped by function.The pads on the Kakute are all crammed into the same area, which usually leads to a mess of wiring.
Of course, this is a personal thing and not everyone has the same taste in FC layouts
“All-in-One” (all in one flight controller esc) FC and Integration
4-in-1 ESC and AIO flight controller esc?
Recently, 4-in-1 ESCs have become common and are often designed to be used as part of a “stack” for a specific FC, often with the 4-in-1 ESC acting as a PDB.Plugs and connections from the 4-in-1 ESC to the FC are not standardized, so make sure that the parts are compatible before purchasing.
Can AIO FC and 4-in-1 ESC be used together? Yes, they can, but we don’t recommend it.
Using the AIO FC with a separate ESC depending on the type of ESC required
Non-AIO FCs should be combined with PDBs for individual ESCs or 4-in-1 ESCs

Mounting Style
The mounting style is the hole spacing in the flight controller. Common mounting styles are 30.5 x 30.5 mm, 20 x 20 mm, and 16 x 16 mm.The mounting style depends greatly on the size of the board and the size of the airplane for which it is designed.5-inch and larger airplanes typically use 30.5 x 30.5 mm, while smaller airplanes use 20 x 20 mm.16 x 16 mm is popular in miniature assemblies of less than 100 mm. popular amongst.
Other flight control features
Blackbox: flash memory or SD logger?
Blackbox data is useful for tuning and troubleshooting.
There are two ways to record black box data – storing flight logs on an SD card or integrated flash memory.
Flash memory is cheaper to use, but also very limited in logging time. Depending on your logging rate and the amount of flash memory on the FC, it will typically only capture 10 to 20 minutes of flight data. It is also very slow to download, taking up to 5 minutes to download one minute of flight logs.
Flight controllers with built-in SD card readers allow you to insert an SD card so you can log for weeks without worrying about running out of space. Reading the data and removing the memory card is also very quick and you can access the log immediately.
Black box logs actually diagnose almost imperceptible problems with flight characteristics for more experienced pilots, such as racers looking to squeeze out every drop in performance. For the average amateur, this may not be necessary unless you are really keen on tinkering.
If your FC does not have an SD card slot or flash memory for the black box, it is possible to obtain an external SD card reader (Open Logger) and connect it to the FC via UART.
Connector Types
The three main connector types on the flight controller are
- Plastic JST connectors
- Solder Pad
- Through-hole
Plastic JST connectors are not as durable, although they make it easier for you to connect/disconnect wires. Solder pads are more robust, but you can run into them when under pressure or when they overheat while soldering. The through-hole is flexible because it gives you the option of direct soldering or using a row of pins.
BEC (Voltage Regulator)
Most FCs offer 5V regulator pads. Some even provide 9V, 12V or other voltages. These voltage regulators are often referred to as ” BEC” (Battery Elimination Circuit).
While it is now possible to power many FPV rigs (FPV cameras and VTXs) directly with LiPo batteries, I have found that powering them through a regulated power supply produces better results.
Camera Control
A feature that allows you to configure FPV camera settings using the radio transmitter and Betaflight OSD. Learn more about camera controls here.
Boot (Brush) Button
Pressing the boot button (or bootloader button) puts the FC into bootloader mode. This allows you to “force” the use of the flash firmware in case the normal firmware does not work properly (why use the bootloader button on the FC).
Initially, the FC is supplied with 2 solder pads so that you can bridge it if you need bootloader mode, and the bootloader button makes it much easier.
Soft installation
Soft mounting is good practice to reduce vibrations transferred from the motor to the gyroscope. When installing flight controllers, there are two main types of soft mounts: rubber brackets and grommets.
All pictures are from the Internet. If there is any infringement, please contact me and I will delete it. luis@mepsking.com