
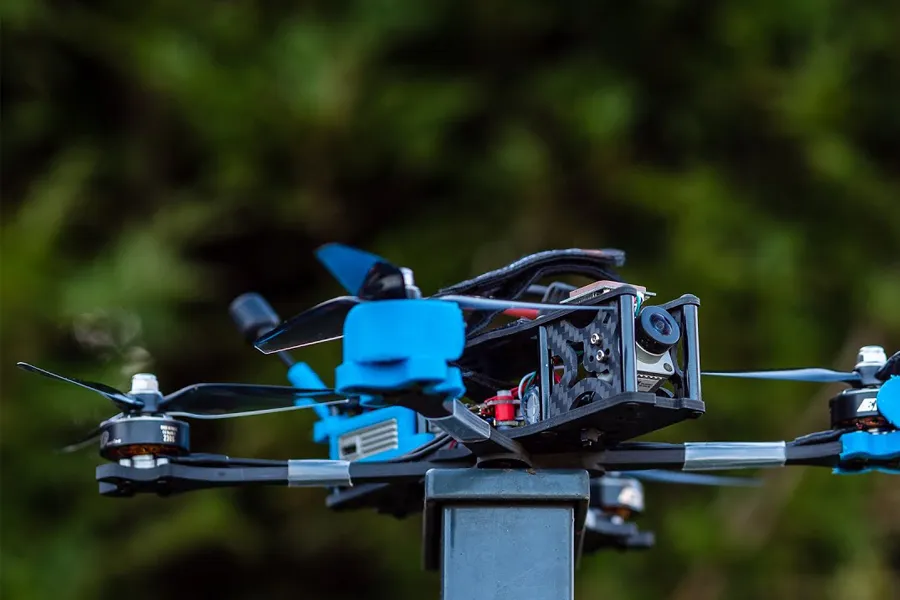
How to build your first 5inch freestyle FPV drone
The world of FPV (First Person View) freestyle drones offers an exciting realm for both newcomers and seasoned enthusiasts. While it’s tempting to purchase a ready-to-fly drone off the shelf, building your own freestyle FPV drone from scratch can be a rewarding and educational experience. In this comprehensive guide, we will walk you through the step-by-step process of constructing your first FPV freestyle drone, from selecting the components to completing the build and taking to the skies.
The Joy of Building Your first 5inch freestyle FPV Drone:
Building your own freestyle FPV drone brings a sense of accomplishment and valuable insights into the world of drone technology. Additionally, constructing your drone allows you to have a deep understanding of each component’s integration, which is vital when it comes to troubleshooting and repairs in the future. Though the journey might present challenges, with dedication and perseverance, the experience of crafting your FPV drone will be incredibly fulfilling. Don’t be afraid to seek guidance from seasoned pilots online or experiment with a trial-and-error approach to learning.
The first step in building your 1st freestyle FPV drone is selecting the right components. Each part plays a crucial role in the drone’s performance, so it’s essential to make informed decisions. Let’s guide you through the selection process, from choosing the frame and motors to selecting the flight controller, electronic speed controllers (ESCs), camera, and video transmitter.
- Choosing the Frame:
The frame is the backbone of your FPV drone and determines its overall size, weight, and durability. Frames come in various materials such as carbon fiber, aluminum, and plastic. Carbon fiber frames are popular due to their lightweight and high strength. Consider factors like frame size, motor mounting options, and the ability to accommodate different battery sizes when choosing the right frame for your freestyle drone.
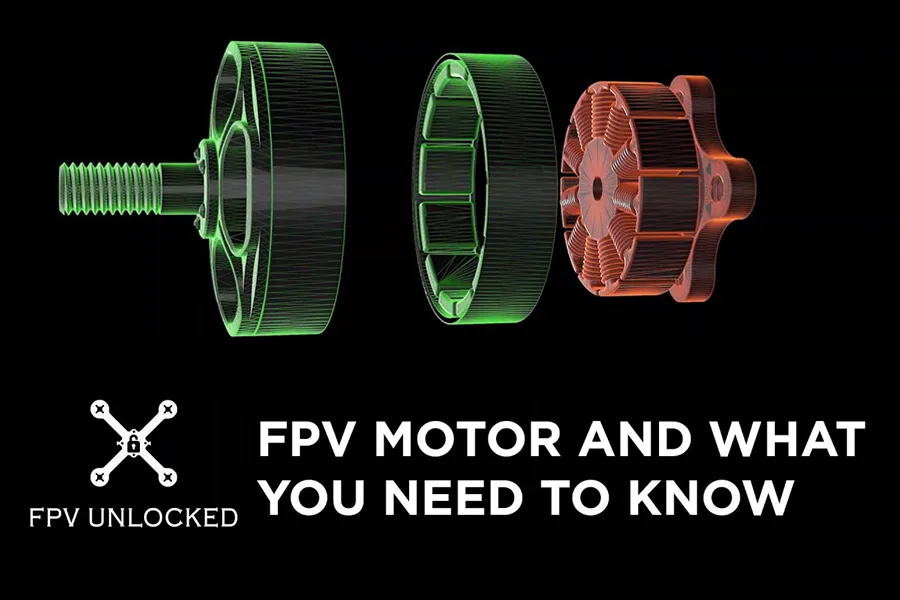
- Selecting the Motors:
Motors are the heart of your drone, and their performance directly impacts flight characteristics. Look for brushless motors with sufficient thrust-to-weight ratio to ensure agile and acrobatic flights. Motor sizes are denoted by numbers such as 2207 or 2306, where the first two digits represent the stator width, and the last two digits represent the stator height in millimeters. The higher the numbers, the larger the motors and potentially higher thrust capabilities.
- Choosing the Flight Controller (FC):
The flight controller is the brain of your drone, responsible for interpreting your inputs and adjusting the drone’s motors accordingly. Opt for a reliable and feature-rich flight controller that supports the firmware of your choice, such as Betaflight or Cleanflight. Ensure it has enough UART ports for future expansions, like GPS or LED strips.
- Selecting Electronic Speed Controllers (ESCs):
ESCs control the speed of each motor based on signals from the flight controller. Choose ESCs compatible with the motors and capable of handling the current your drone requires. Many pilots prefer 4-in-1 ESCs due to their space-saving and clean wiring benefits.
- Choosing the Camera and Video Transmitter:
For FPV flying, a high-quality camera and video transmitter (VTX) are essential. Look for a camera with a wide dynamic range and low latency for better visibility in various lighting conditions. Match the camera’s video format (PAL or NTSC) with your FPV goggles or monitor. As for the VTX, consider its output power, channels, and compatibility with your local regulations.
Here are my recommendations of the FPV drone kit components that you will need :
 1.Frame TBS SOURCE ONE V5 |  2.SZ F7 HD Flight Controller with Dji O3 air unit |  3.SZ SZ60A 6S ESC 4in1 |
 4.Motors SZ2207 FPV Racing Drone Motor x4 |  5. Propellers : SZ4942 Racing Drone Prop |  6. battery : Tattu R-Line Version 4.0 1300mAh 6S1P |
 7. CADDXFPV Nebula Pro Vista Kit |  8. elrs receiver |  9. radiomaster boxer fpv controller |


Step 1: Preparing the frame
Before assembling the frame, take the time to smooth out any sharp edges on the carbon fiber pieces. Sharp edges can potentially damage wires and battery straps in the event of a crash. Also, chamfered edges can help prevent carbon fiber sheet delamination during impacts. Afterward, wash all carbon fiber parts thoroughly in soapy water to remove any residual carbon dust resulting from cutting, drilling, and sanding. Remember, carbon fiber is conductive, so ensure the parts are adequately dried before proceeding.
Step 2 : Attaching the Motors
Mounting the four motors onto the arms is the next step. Using thread-lock on the motor screws is highly recommended to prevent loosening due to vibrations over time. Check that the motor screws are not too long and coming into contact with the motor winding, as this can cause damage during operation. Double-check the screw length and make adjustments if necessary for a safe and secure motor attachment.
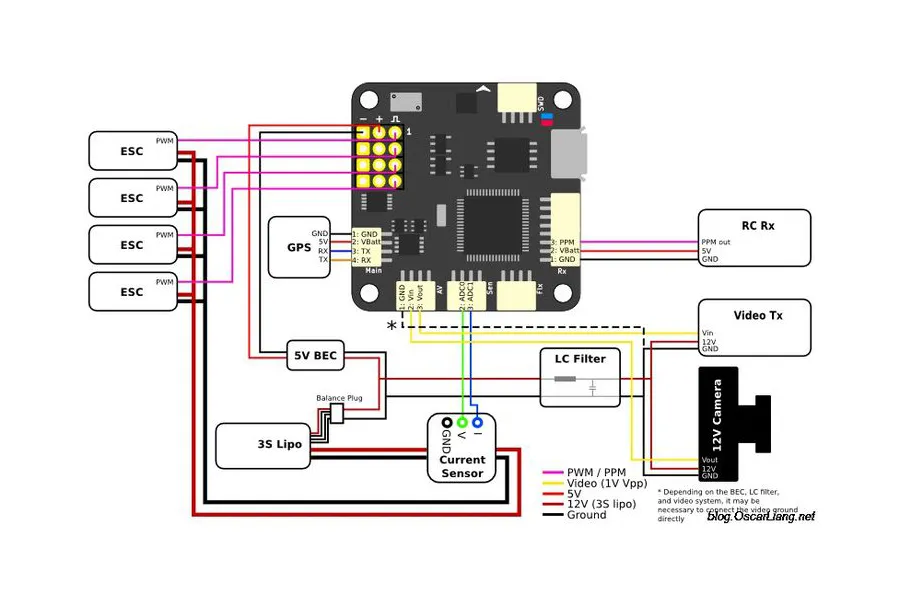
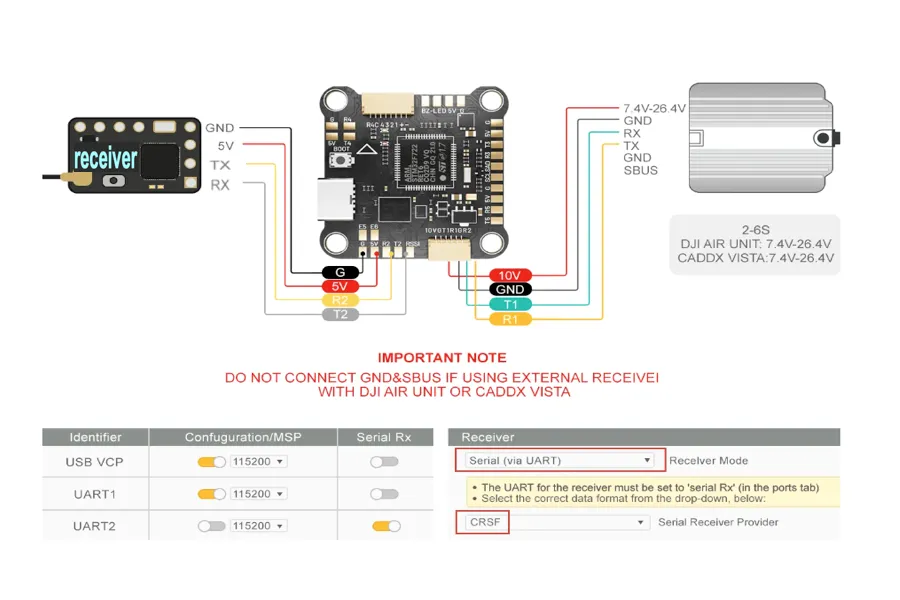
Step 3 : READ the wiring diagrams FC/ESC
Understanding the wiring diagrams for all the components is essential before proceeding further. These diagrams will guide you through the assembly process and ensure the correct wiring setup for optimal performance.
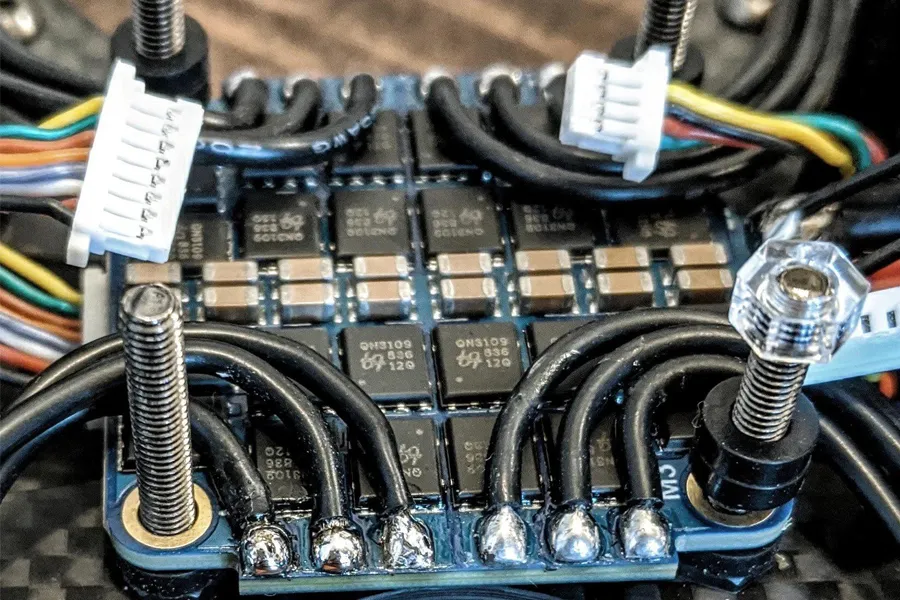
Step 4: Installing ESC/FC to the frame
Gently slide the 4in1 ESC and FC boards onto the four long screws, being mindful of the ESC board’s power pads facing backward and the motor solder pads facing upward. To determine the front of the frame, look for the cut-outs designed for the camera mounting plates; they will help you identify the correct orientation. Make sure the boards fit snugly onto the screws, as this secure positioning is essential for stable performance during flights.
After placing the 4in1 ESC and FC boards onto the screws, carefully inspect the bottom of the ESC to ensure there is no direct contact with the frame. Any contact between the ESC and the frame could lead to undesirable consequences, such as electrical interference or potential damage to the components.
Moreover, double-check for any potential contact points between the ESC and FC boards. They should be well-positioned and not touching each other to prevent any short circuits or unintended behavior during operation. Taking the time to thoroughly inspect these connections will help ensure a safe and reliable drone build. Once confirmed, proceed with securing the boards in place using the appropriate nuts or fasteners, maintaining a suitable distance from the frame and each other.

Step 5: Soldering the motors and the power cables
Soldering the Motors and Power Cables
Soldering is a critical step in building a functional and efficient FPV drone. Assess the required lengths of motor wires, leaving a little slack for flexibility, and secure them along the arms using tape for protection. Carefully solder the motor wires to the ESC’s corresponding motor pads, designating the red wire as positive (+) and the black wire as negative (-). Solder the wires to the appropriate input power pads on the ESC, ensuring a solid and secure connection. Additionally, solder the capacitor to stabilize the power input, reducing potential voltage spikes or noise for smoother performance.
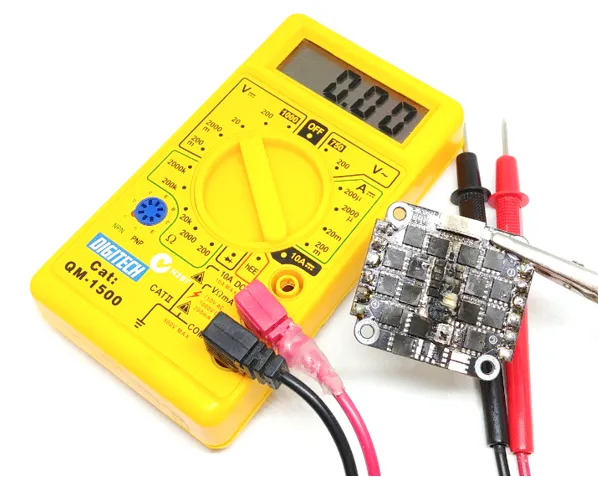
Step 6 : Testing for Electrical Shorts:
Before connecting the LiPo battery for the initial test, ensure there are no electrical shorts in the system. Use a multimeter in continuity mode and test the positive and negative terminals of the XT60 connector or solder pads. Address any short circuits or issues before proceeding with the battery connection to prevent damage to your components.
Step 7: connecting the lipo battery for 1st time
Connecting the LiPo Battery for the 1st Time
When connecting the LiPo battery for the first time, using a smoke stopper as an additional safety measure is highly advisable. A smoke stopper acts as a protective fuse, limiting excessive current flow through the circuit in case of a short circuit or electrical issue, safeguarding your components from potential damage.
A smoke stopper is a simple device designed to act as a protective fuse, preventing excessive current from flowing through the circuit. If there is a short circuit or any other electrical issue, the smoke stopper will limit the current flow, potentially saving your components from damage.
By using a smoke stopper during the initial battery connection, you can identify and address any potential issues without risking harm to your expensive electronic components. It provides peace of mind and can be considered a wise investment in ensuring a smooth and safe build process.
After testing and ensuring everything is in order, celebrate your successful drone build by installing the top carbon plate of the frame.
Congratulations on completing your first drone build! However, the journey is just beginning; thoroughly test all components, perform a pre-flight check, and follow safety protocols when flying your drone.
Conclusion:
Building your own FPV freestyle drone is a thrilling and educational endeavor. From selecting the components to completing the build, you’ve gained valuable insights into drone technology and the satisfaction of flying your own creation. As you venture into the world of FPV, continue learning, experimenting, and fine-tuning your drone to enhance its performance. Embrace the forthcoming adventures with enthusiasm and enjoy the exhilarating flights from a whole new perspective.
Happy flying! In the next guide, we’ll walk you through configuring your drone using the Betaflight Configurator, optimizing its flight performance using this popular open-source flight controller software.
Author:kinky.fpv
FB:Ågorastós Laskarídes
INS:kinky.fpv